C.V.SmithARTWORKS
  • Home
  • Blog
  • Sculptures
    • Bronze
    • Clay / Apoxie Clay
    • Plaster
    • Wood
    • Stone
    • SLIDESHOW
  • Galleries
  • Contact
  • Book
  • River Arts
  • BRAF
  • Saltwater Artists
  • CMCA
  • Yarmouth Art Festival

Up the Down Staircase ... the Saga Continues

11/28/2012

0 Comments

 
Picture
Picture

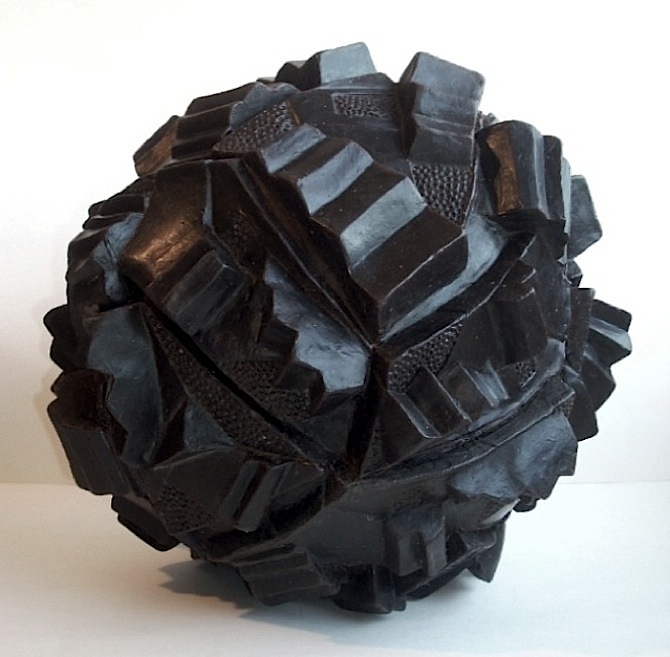
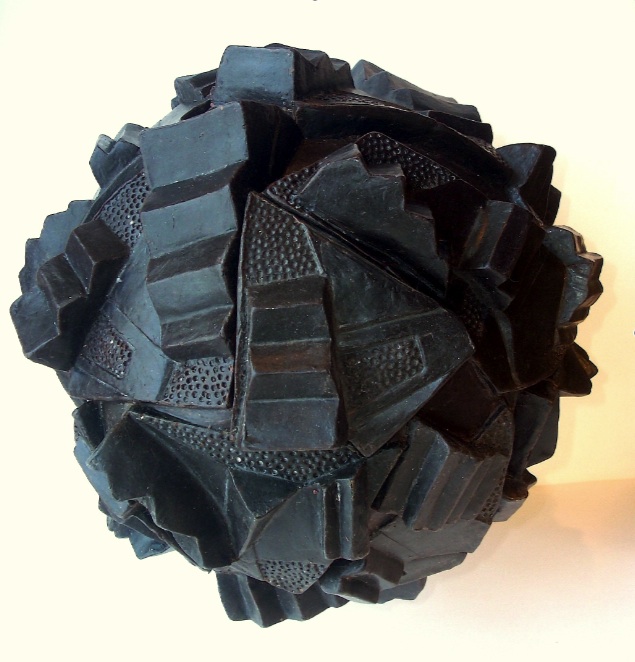
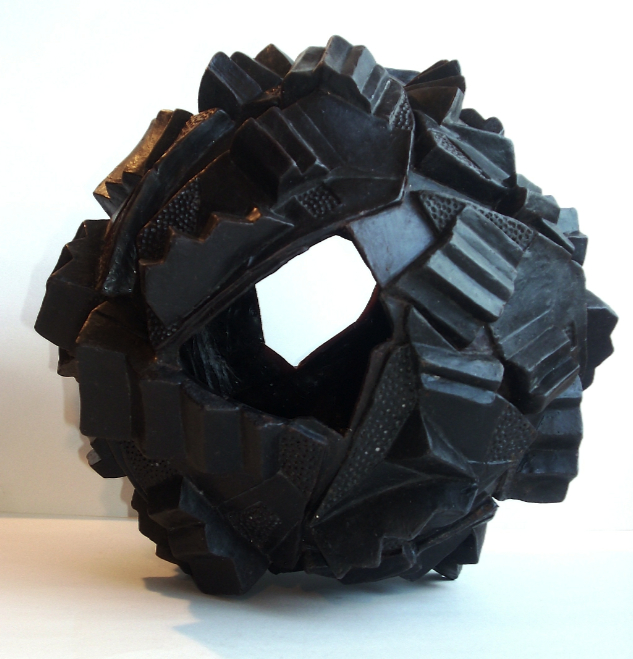
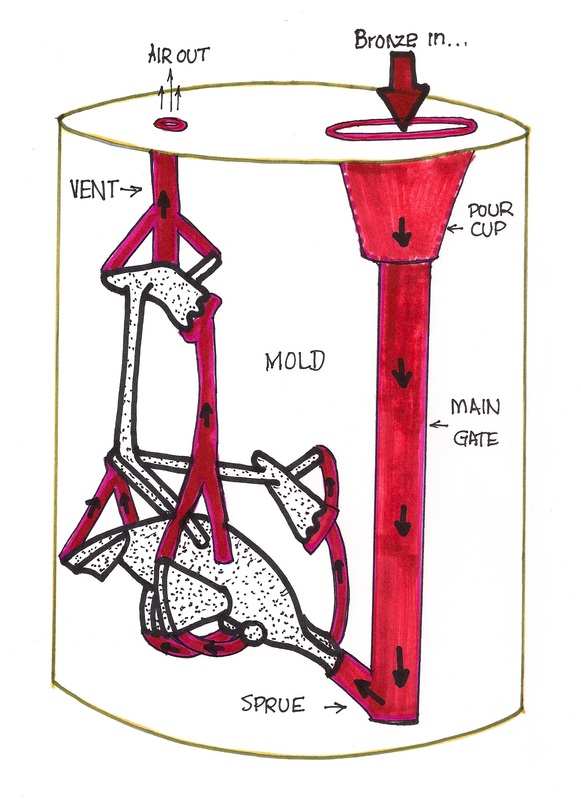
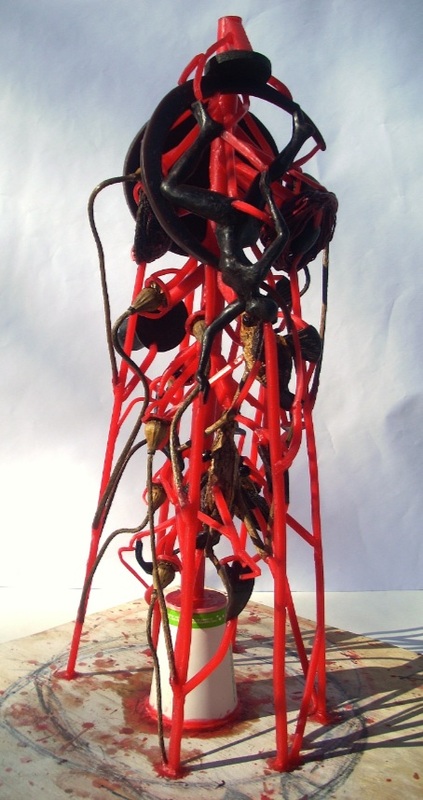
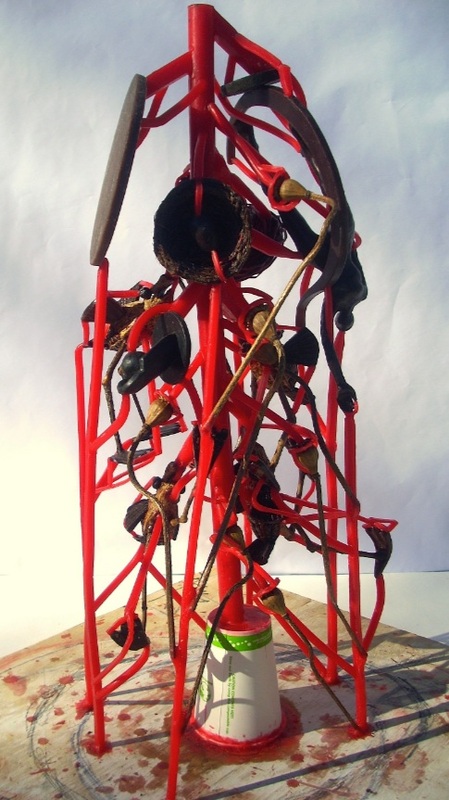
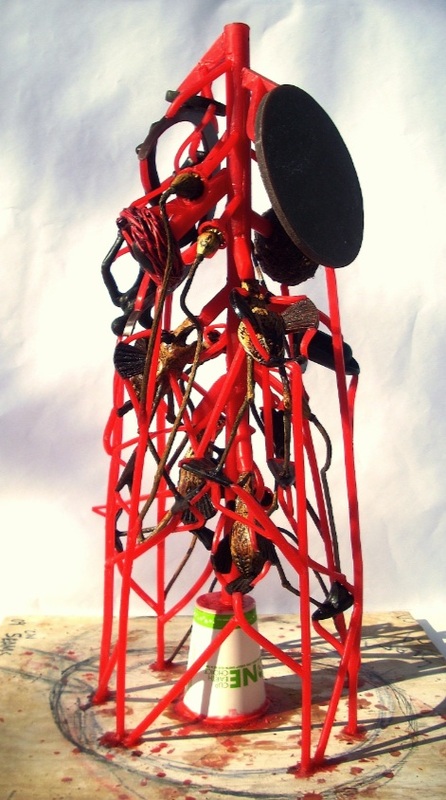
    This is a progress report on the continuing tale of the sphere of ascending and descending stairs made of the wax casts described in my blog entry of 9/11. The sphere itself has been completed. The next step in the plan is to proceed with gating the piece using a large main gate which will go through the center of the ball and feed up from the bottom through several sprues. I have made openings at opposite sides of the ball, taking out small sections which will be cast with the piece and reattached after the piece is chased. The large central main gate will allow me to make the mold smaller and the heat it will hold will also help minimize warping in the piece by evening out temperature in the center of the mold as the hot metal cools. The tricky part will be to devise a gating system that will force the bronze to flow completely through all of the angles and planes and exit the vents...a bit of an engineering challenge, but, as I have said before - I enjoy a challenge. 
Picture
Picture
Picture
Picture
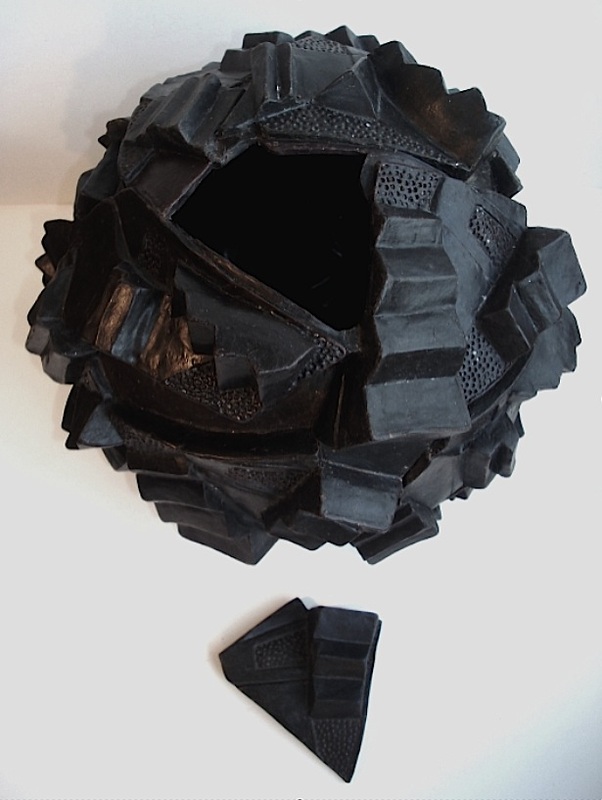
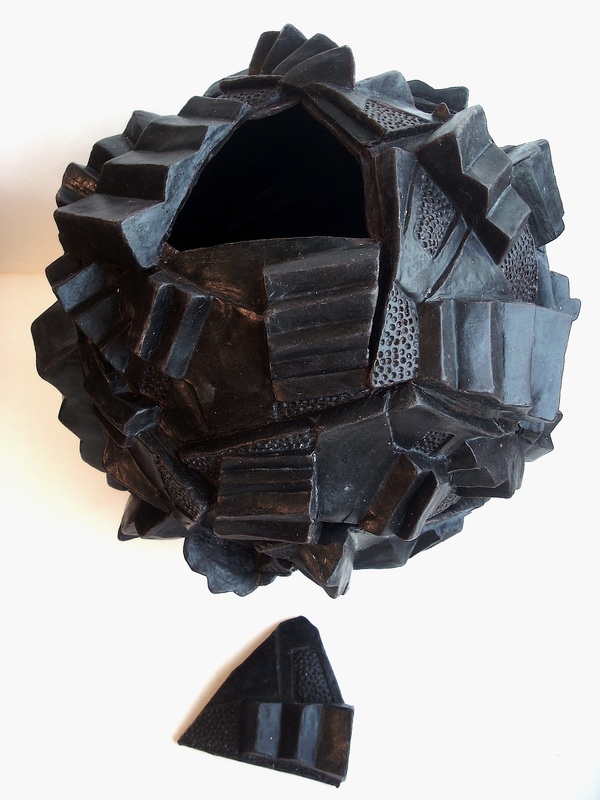
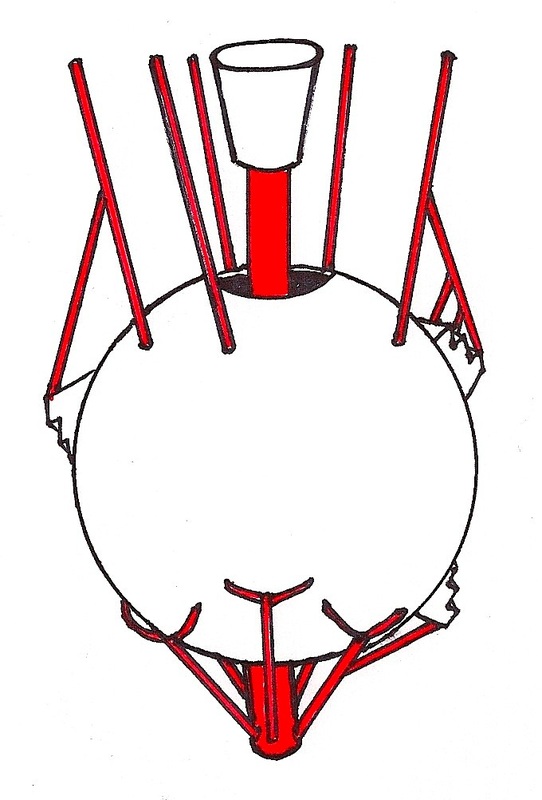
Simplified gating plan...all projections & angles must be gated or vented
0 Comments

Burned out, poured and ready to chase ...

11/20/2012

0 Comments

 
Picture
Loading molds in kiln for burn out
Picture
Molds packed with damp sand in flasks
Picture
Lifting crucible of molten bronze from furnace
Picture
Pouring bronze into molds
     I participated in a bronze pour last Friday with an alumni group led by Professor John Ventimiglia and sculptor Sandy MacLeod at Maine College of Art in Portland. We had spent the week getting ready...gating our wax pieces (see blog entry for 11/5), putting them in investment molds, and burning out the wax from the molds in the kiln. On Friday we placed the hot molds in wooden flask frames and packed damp sand around the molds to keep them warm and to keep them from splitting open when the bronze was poured into them. We had a 'slight' delay when a sprinkler head let go and showered everything with water. After getting the water shut off, mopping up the floor, drying off the molds and the furnace controls, we finally proceeded with the pour. The following day we broke the pieces out of their molds, cleaned off the investment residue and cut off the gating. All of the pieces I cast came out successfully... the figure and base, the pod birds and nests, and the poppy pods with stems. The next step will be to chase and clean up the gating attachment points and any surface imperfections or flashing. One bird done... and a flock to go!
Picture
Picture
Picture
Picture
Picture
Picture
1st pod bird chased...
0 Comments

Deviation ... Inside the Box and Out of the Button Jar

11/13/2012

0 Comments


Picture
Sarah's Lament ______ 8 1/2" x 13 1/2"


Picture
Button, Button... ___________ 12"x12"
    Having spent the last few weeks mired in wax projects and gating, I took some time to jump off the beaten path and work with some 'old' materials on a couple of new pieces for 2 upcoming shows. The first piece I have titled 'Sarah's Lament ' , and is made in the style of an old fashioned shadow box. I was going through some boxes of miscellaneous small antiques & collectibles that I had stashed away in the cellar and came across a wooden utensil box, a sepia photo of a seated woman and a 'Let Us Have Peace' pin. The woman looked to be deep in thoughts that were far removed from the occasion of having her photograph taken. I called her Sarah. Then I proceeded to root through my collected treasures to find the elements of Sarah's life and dreams - the expected tokens of home and womanhood, along with an ink bottle with a picture of the Sphinx on it, two advertisements for railroad lines, a Swedish matchbox, a seashell, and a key... the hints of a road not taken.

     The second piece was inspired by a canning jar full of buttons that had been accumulated over the years by my mother and then added to by me. I needed a piece for the Scholarship Fundraiser  'Art in the Square' at the BRAF Gallery in Boothbay Harbor. All of the work was supposed to be done on a 12"x12" canvas so, as a sculptor, I had to get a bit creative. The buttons had been begging to be utilized in some way for a long time and this seemed to be the perfect opportunity. My original intention was to spray the canvas and buttons with the same textured paint that I used on the 'Memories of the Lost'  boat (see 8/15/12 blog entry) but, as I attached the buttons, I decided that the colors of the buttons and the way they were distributed would give the piece greater depth and movement. It resulted in a virtual galaxy of buttons.
0 Comments

Ready, Set... Gate! Ready to Invest

11/5/2012

0 Comments

 
Picture
Red wax is the gating material
Picture
Simplified example of bottom feed gating as seen inside mold
Picture
Figure & 1st pod bird attached to main gate
      After completing the pod birds (10/8 blog) and the figure (10/20), I began to gate the pieces in preparation for making the investment mold and then the bronze pour. The gating process becomes more challenging if the piece has multiple angles and varied thicknesses, especially if some areas are very thin. All of the items I was gating fell into this category (except for the flat base for the figure). It is important to make sure that once the wax is burned out of the investment mold, the remaining air space allows for an uninterrupted flow of bronze through the mold. I chose to use the bottom gate method in which the bronze flows down from the pour cup to the bottom of the main gate and then travels back up through the upward slanting sprues into each piece, forcing the air in the mold ahead and out the vents. This technique will create a more efficient flow of bronze in the birds - entering through the thicker body and then exiting the thin legs and out the vents.
     Gating for multiple objects with multiple angles is time consuming. Any projections which differ from the natural upward path of the bronze flow must be connected with the appropriate angle of gating or venting...gates to bring in bronze, vents to allow air to travel out the top of the mold. In the case of the birds, this meant attending to the bulging eyes, the tips of the wings and tails, and the toes and heels of the feet. The figure had similar issues in its limbs. The first step for me was to attach as many connecting gates as possible on each piece before attempting to attach them with sprues to the main gate. This allowed for easier access and less handling after the pieces were attached to the main gate. 
     The final step in gating was to attach each piece by a sprue to the main gate, complete the venting process, and try to keep the structure compact so that the eventual mold will be a manageable size. Given number of pieces and their irregular shapes, the final structure became a maze of intertwined bird legs, bird nests, and human limbs, not to mention several dried poppy seed pods with stems. (If you are into solving puzzles, this is a fun challenge.) Hopefully everything is securely attached and will withstand the pouring of the investment into the mold flask. Fingers crossed!
Picture
Picture
Picture
0 Comments

    Author

    Cynthia Smith, Maine artist, originally from Connecticut. Taught art at secondary level for 35 years, retired in 2004. Sculpts in bronze, wood, stone, clay & plaster. Her work can be seen at several mid-coast Maine galleries and shows.

    Picture

    RSS Feed

    Archives

    February 2023
    October 2022
    May 2022
    December 2021
    October 2021
    June 2021
    May 2021
    April 2021
    March 2021
    October 2020
    August 2020
    July 2020
    June 2020
    January 2020
    October 2019
    September 2019
    August 2019
    July 2019
    June 2019
    May 2019
    April 2019
    February 2019
    January 2019
    November 2018
    October 2018
    September 2018
    August 2018
    July 2018
    June 2018
    May 2018
    April 2018
    March 2018
    February 2018
    January 2018
    November 2017
    September 2017
    August 2017
    July 2017
    June 2017
    May 2017
    March 2017
    January 2017
    September 2016
    August 2016
    July 2016
    June 2016
    May 2016
    April 2016
    March 2016
    February 2016
    January 2016
    December 2015
    November 2015
    October 2015
    September 2015
    August 2015
    June 2015
    April 2015
    March 2015
    February 2015
    January 2015
    December 2014
    November 2014
    October 2014
    September 2014
    August 2014
    July 2014
    June 2014
    May 2014
    April 2014
    March 2014
    February 2014
    January 2014
    December 2013
    November 2013
    October 2013
    September 2013
    August 2013
    July 2013
    June 2013
    May 2013
    April 2013
    March 2013
    February 2013
    January 2013
    December 2012
    November 2012
    October 2012
    September 2012
    August 2012

Powered by Create your own unique website with customizable templates.