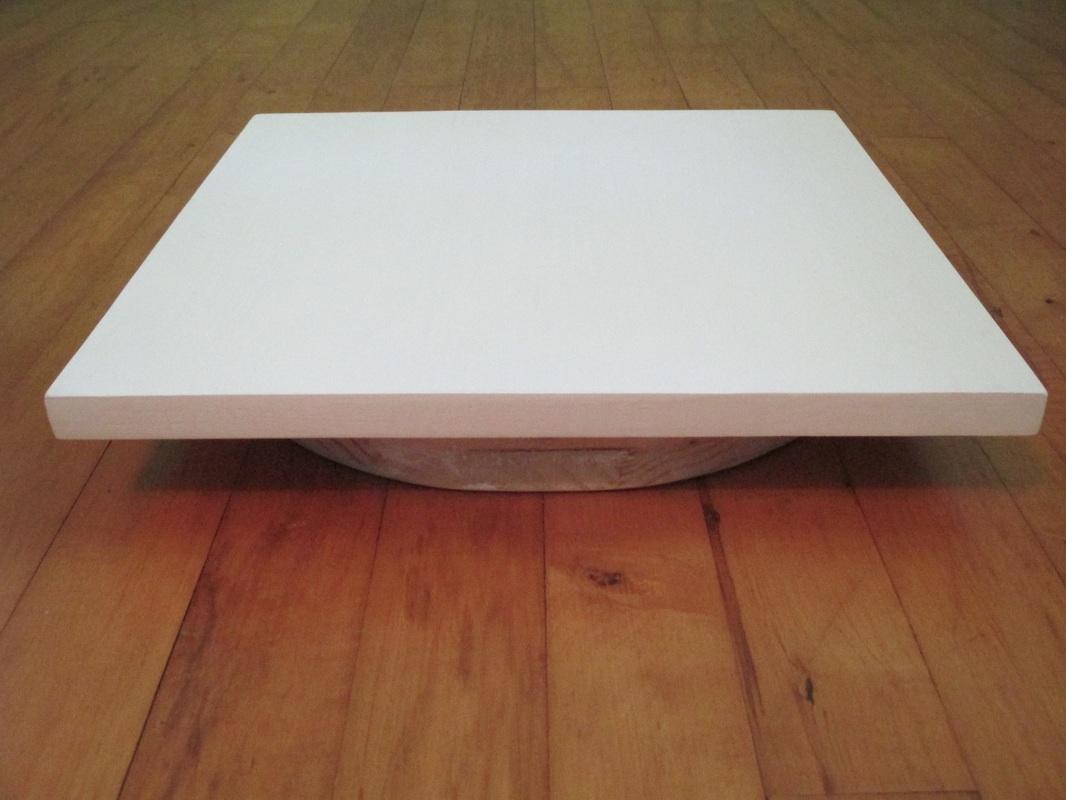
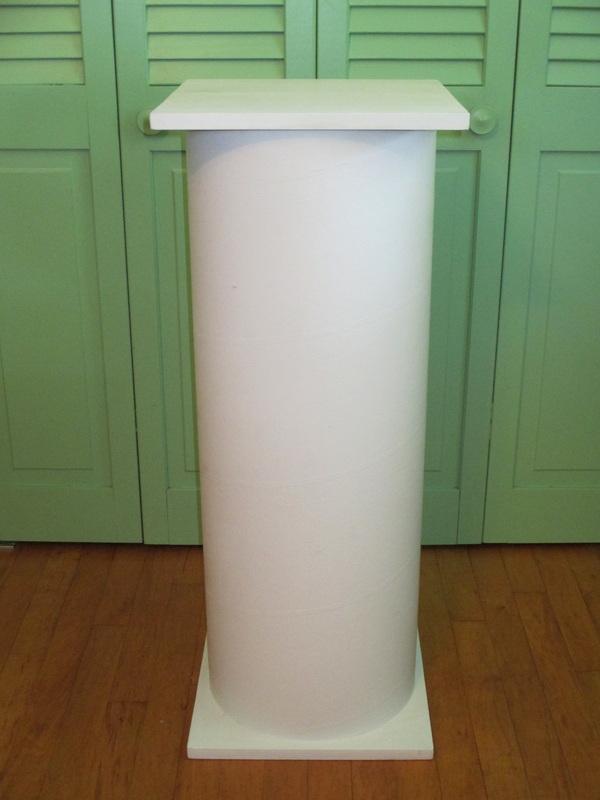
| I sometimes have occasion to participate in art shows that are not always equipped to display sculptures. I understand that keeping a supply sculpture stands of varying sizes can be a challenge to the storage space and budget of some local galleries and once-a-year charity art show sponsors. To mitigate the consequences of that particular potential shortfall, I have chosen to make a few sculpture stands that I can use if none are available at a show venue. The first one that I made was constructed entirely of wood, making it both heavy and a bit pricey. I now only use wood for the top and bottom of the pedestal. I make the body of the stand out of a heavy cardboard Quik-Tube building form (purchased from Home Depot for about $8 -$9 depending on size). The Quik-Tube comes in a four foot length and I can cut it to the height that I need. It also comes in a variety of diameters - I have used both the 12 inch and the 10 inch, depending on the size of the sculpture that is to be displayed. The usual size I make for the top and bottom board is 13"x13", but I also have made larger sizes that can be interchanged if needed for a larger sculpture. Both the tops and bottoms have a thick circular piece of wood attached that fits inside the cardboard tube. This allows the stand to be put together easily and adds weight and stability. The base boards are attached to the tube with finish nails through the cardboard and into the circular piece of wood. I fill the nail holes with white wood filler. The top pieces are left unattached so that different sizes can be utilized on the same base. The next step is to paint the pedestal with white primer, making sure that the black lettering on the tube is completely covered. A final coat of white pint and it's ready to go. Have pedestal, will travel. | 

|
|
0 Comments
It's that time of year again - I've been busy working on two projects for the 10x10Brunswick Benefit Art Exhibit and Sale. This annual event serves as a major fundraiser for the Arts Are Elementary Program which provides experiences in the visual arts, writing and the performing arts to students in kindergarten through the 5th grade in Brunswick. All of the artwork entered is framed in 10"x10" frames and is priced at $200, half going to the artist and half going to AAE. The turnout for the annual event is nothing short of amazing, with art lovers lining up early to be the first to enter the show when the doors open at 5 PM. Most have either viewed the work during the 2 days of previews or checked out the work posted on the 10x10Brunswick website. When the doors open the buyers flood into the viewing areas and head straight to the piece (or pieces) they have picked out ahead of time. The first year that I participated in the show I didn't arrive until 5:30...and never got to see my work hanging - bought and gone! That was great, but, lesson learned! I now go early so I can get a chance to see more of the other artwork.
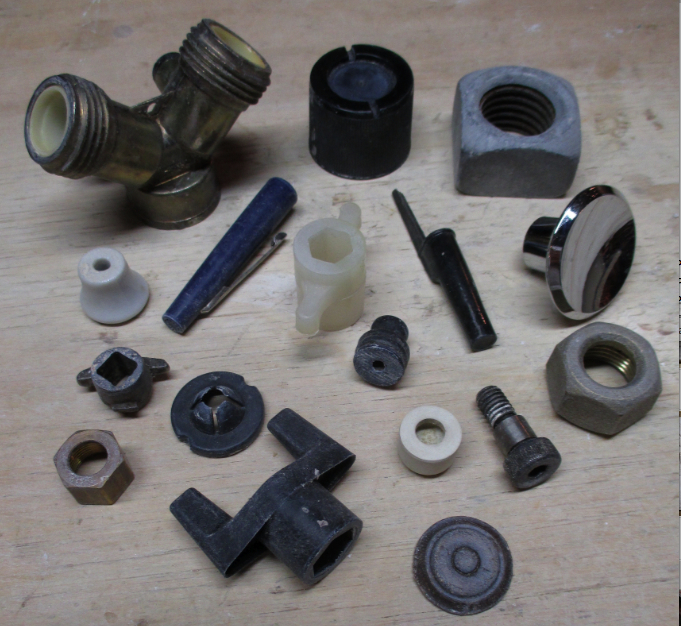
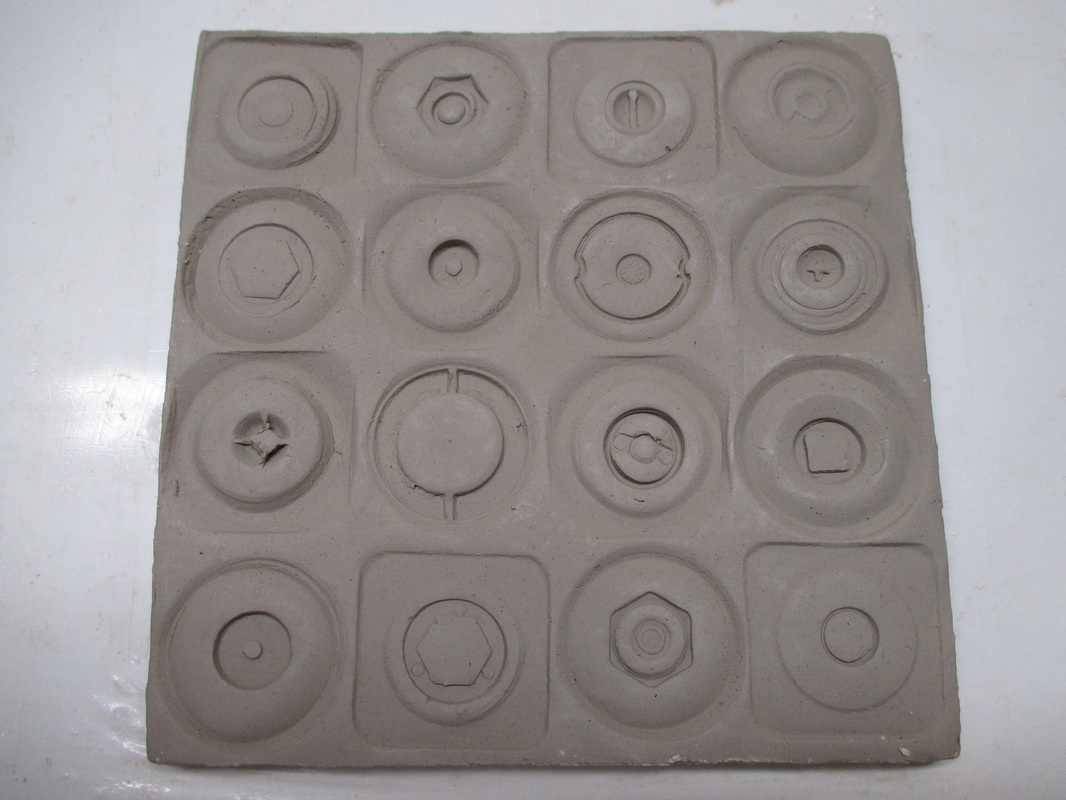
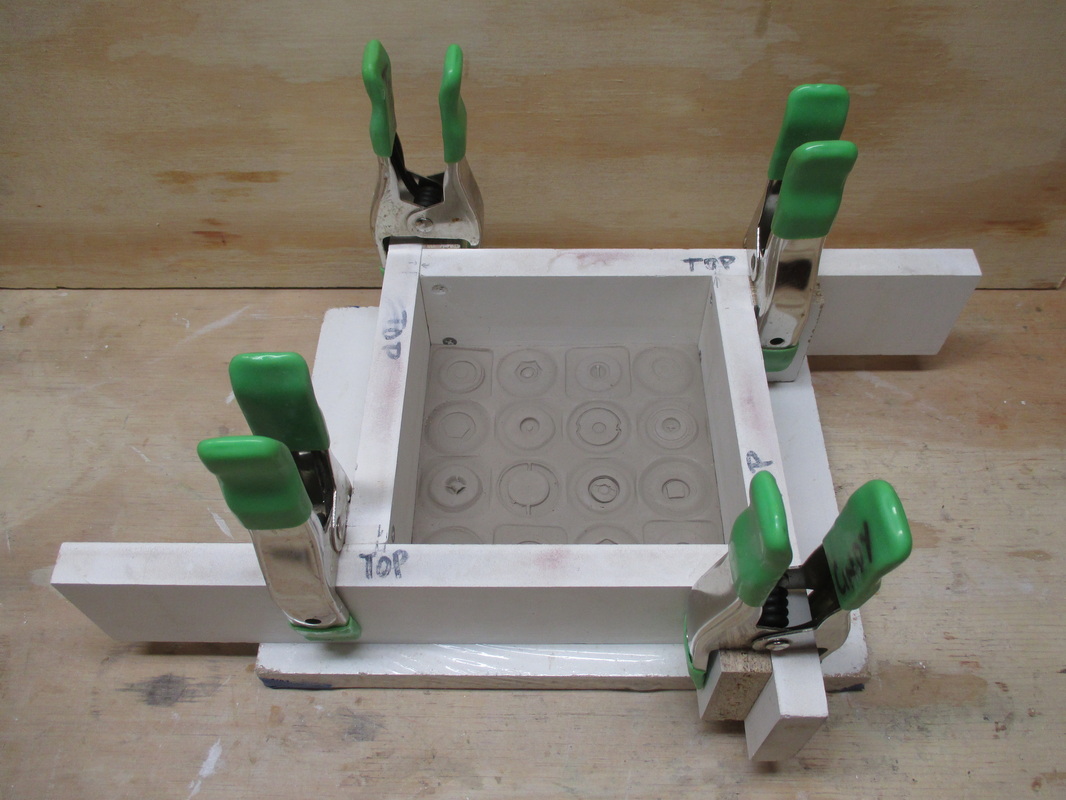
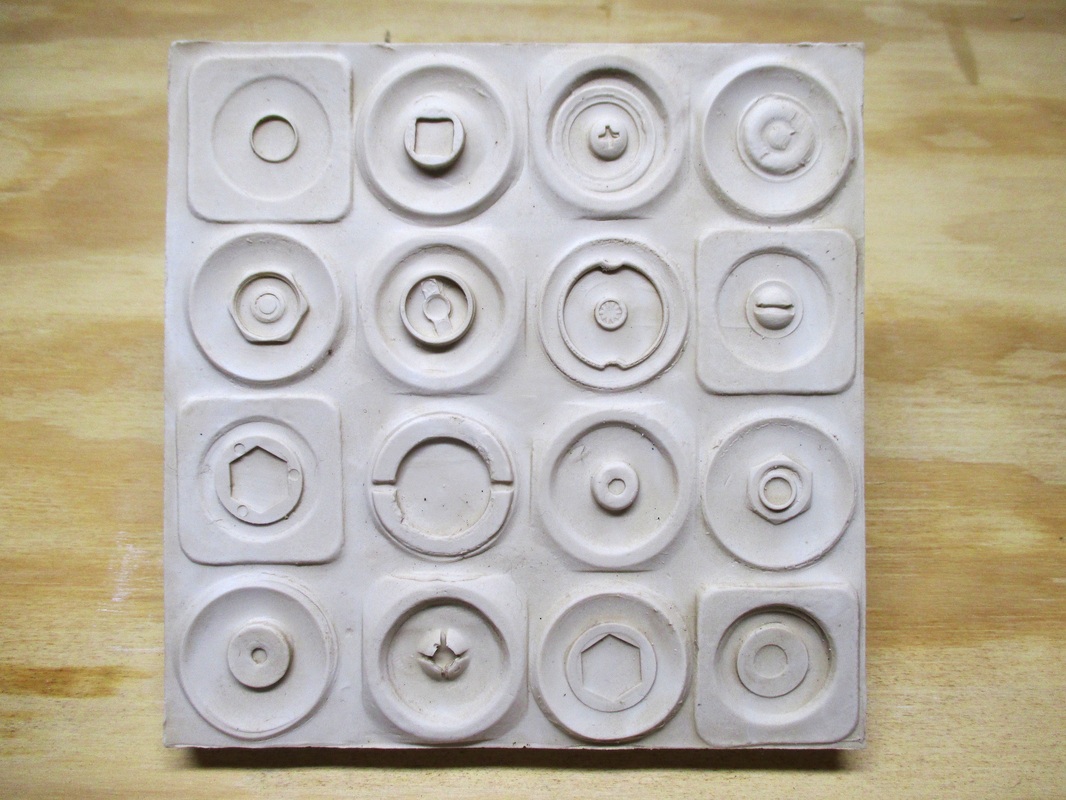
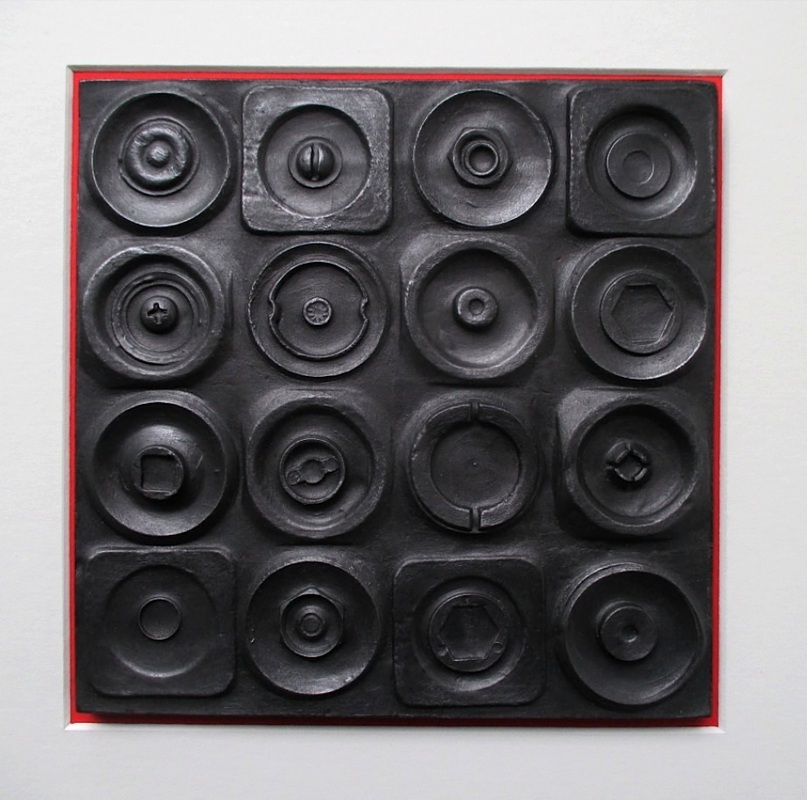
This year I again chose to make plaster relief sculptures. It is a process that allows me to experiment with ideas and techniques in a timely and cost effective way. I began by going to my stash of miscellaneous objects and pulling out some things that looked like they could integrate well into a relief design. The common thread in the group of objects I picked out was that each had a circular aspect to its shape. I ended up pressing the objects into my square clay slab in a symmetrical pattern, 4 rows across and 4 down. The consistency of the size of the impressions was dictated by two objects - a very large nut and a door pull of a similar size. I alternated impressions of these and then went back and added additional shapes in the centers, making sure that no two were the same. After casting the piece in plaster, I painted the it with graphite acrylic paint. This gave the relief a metallic look that actually enhanced the industrial look of the design. One down, one to go.
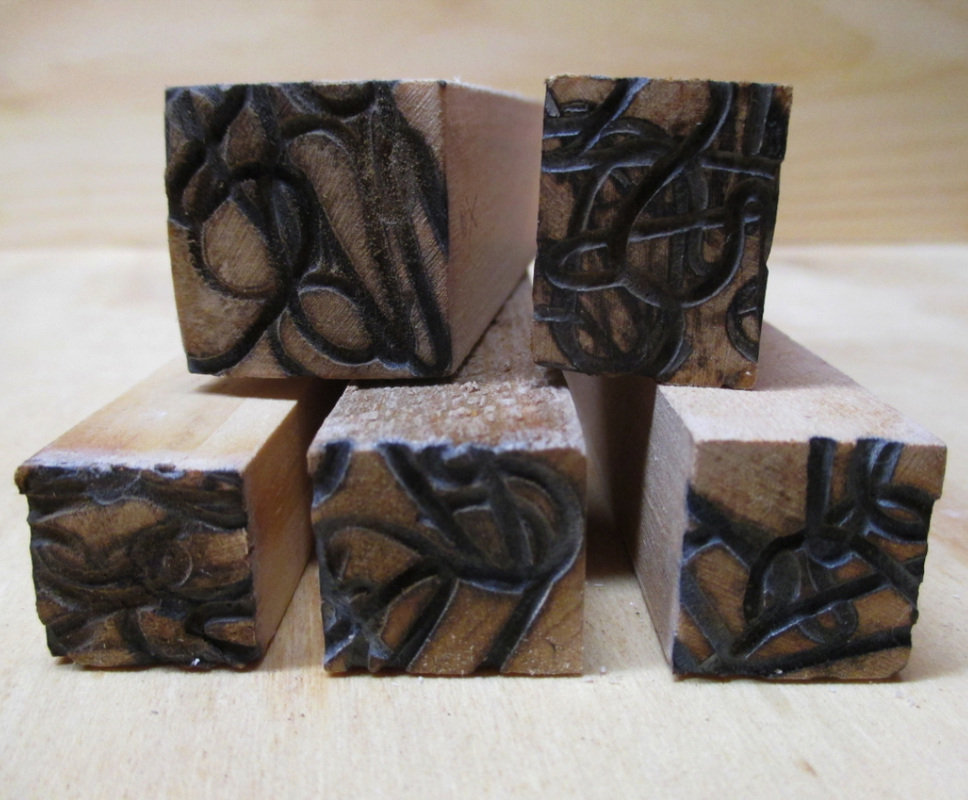
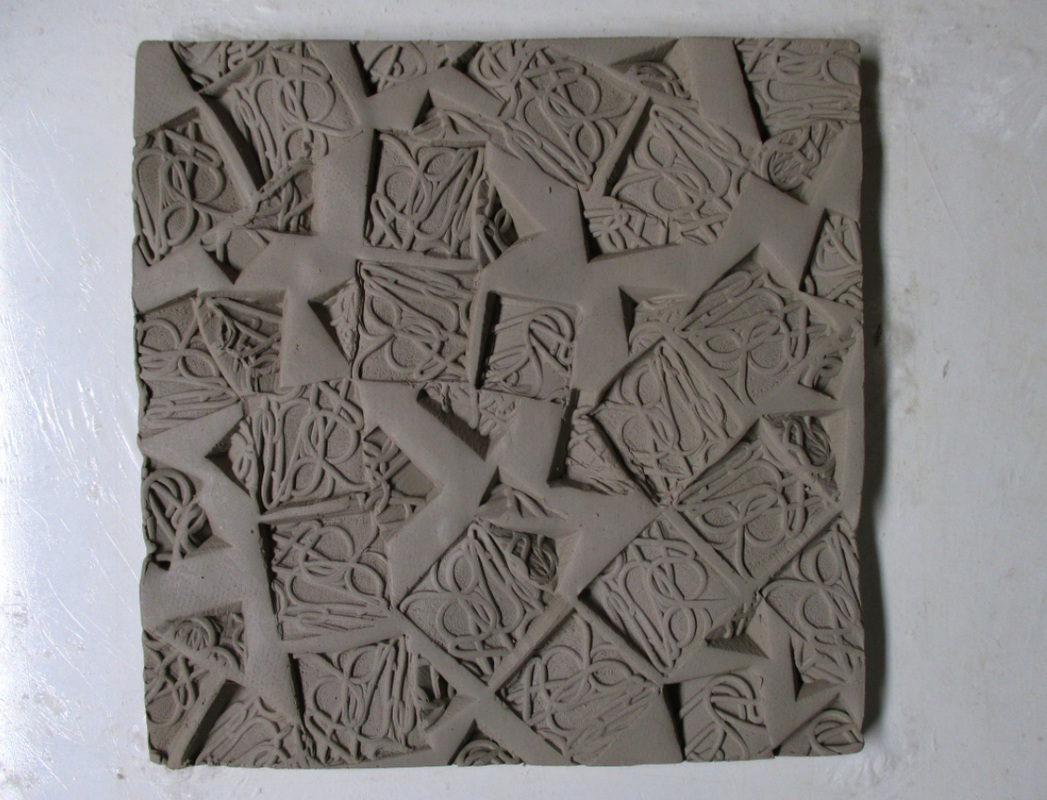
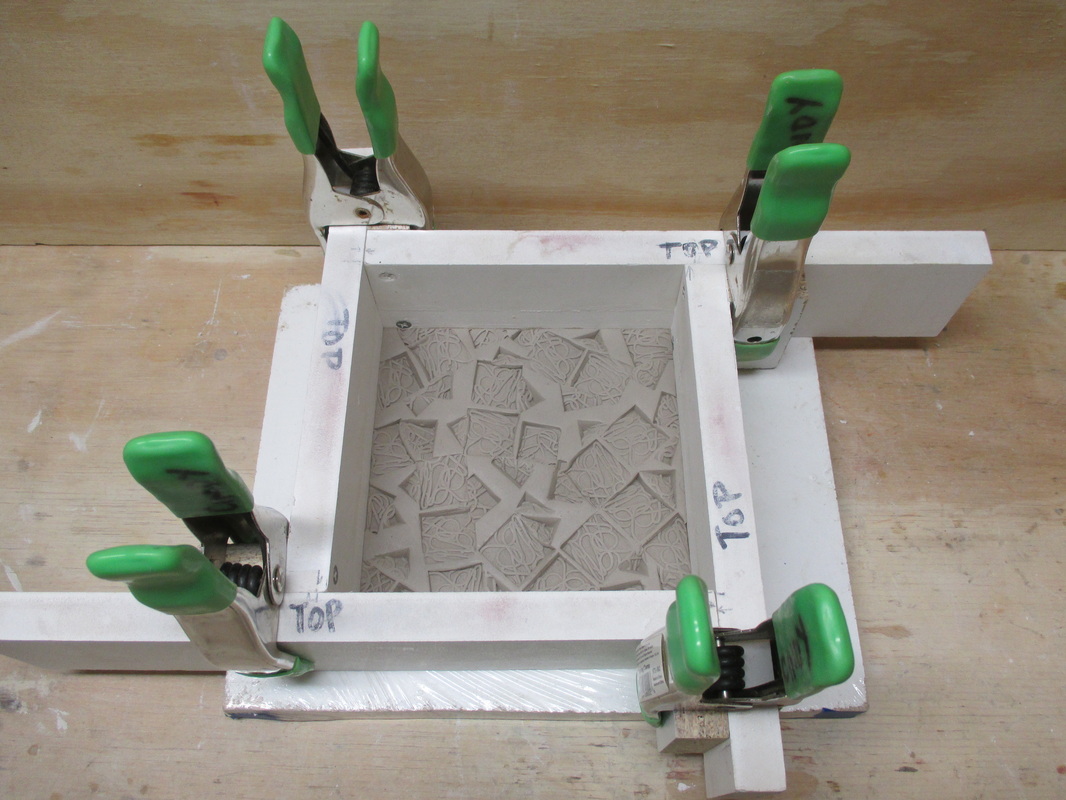
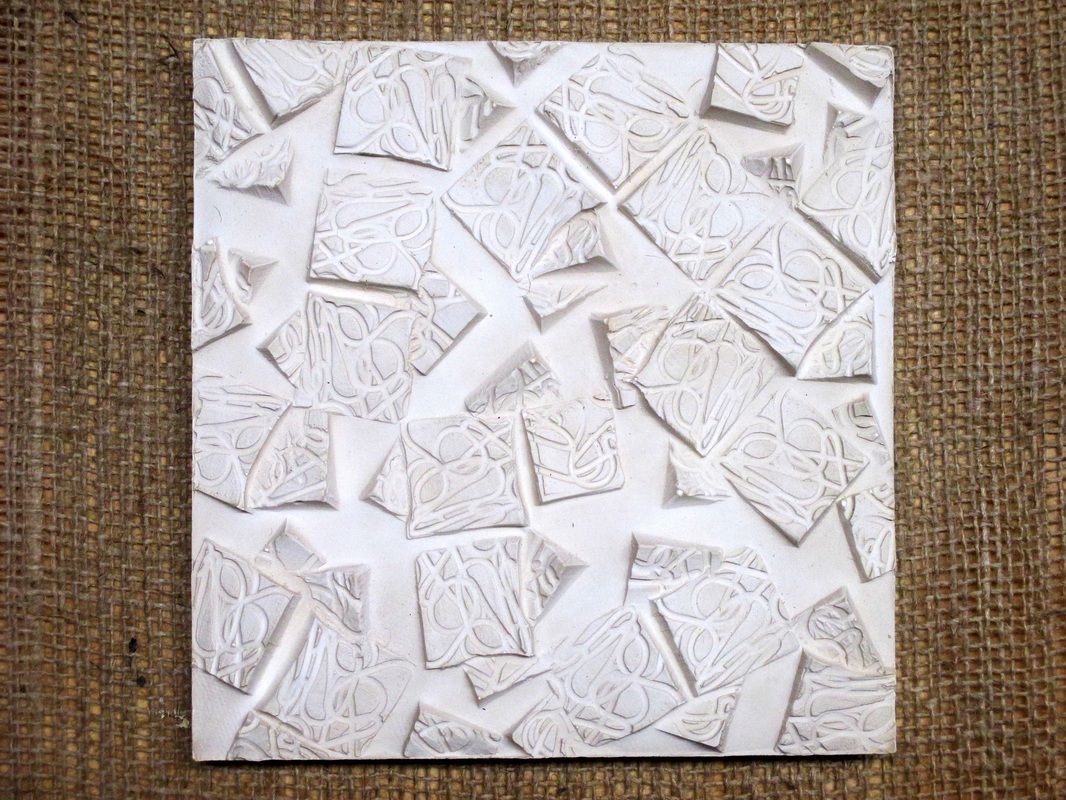
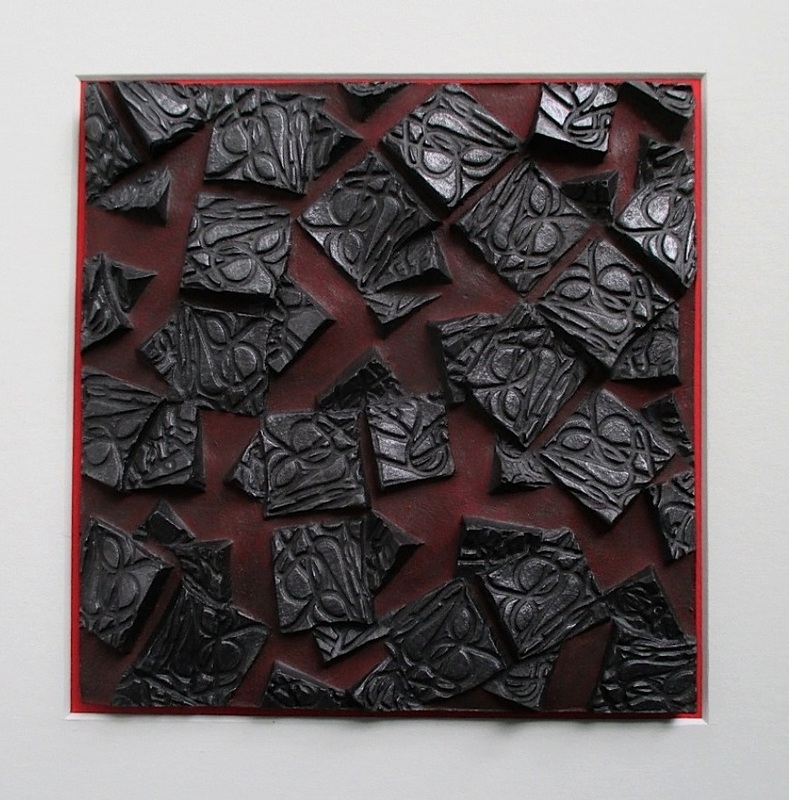
I decided to go in a totally different direction with the second relief. After experimenting with a number of different textured objects without inspiration, I remembered a stick of wood that had a textured or patterned end. As I looked for it, I found that I actually had several of them. (When I finish a sculpture that is made of wood or has a wooden base, I heat a piece of copper wire that is bent into my initials to "brand" the bottom of the piece. I use a scrap stick of wood to press the hot wire onto the surface.) I liked the visual effect that I achieved when I pressed the various sticks of wood into the clay slab. After a couple of overly enthusiastic attempts I self-edited and created a design that I thought had good balance between raised and angled shapes and the flat spaces of background in between. After casting the piece, I painted it with the graphite acrylic, but then went back in and painted the spaces between the raised shapes with a thin coat of a deep red acrylic. This served to visually amplify the "floating" appearance of the raised shapes and to make them more visible. Mission accomplished! The final step was to double mat both reliefs with a red inner mat and a white outer mat. Next stop...Brunswick!
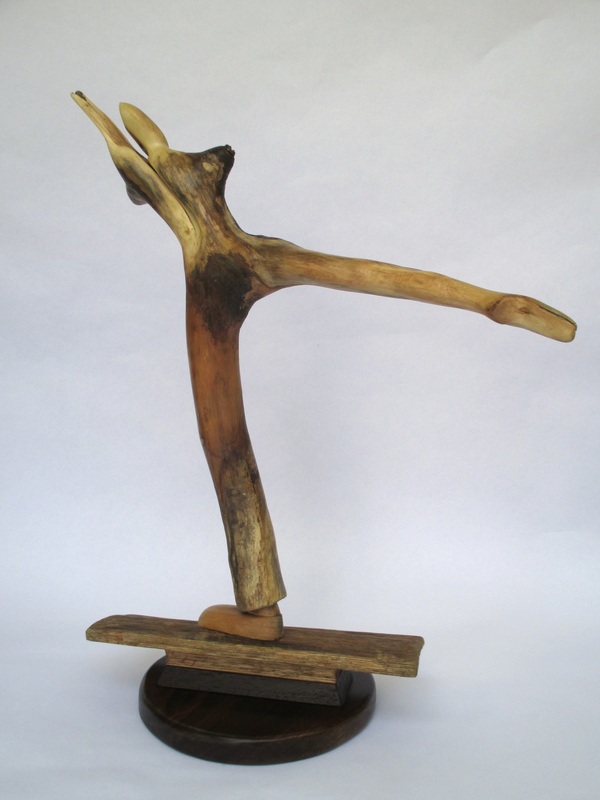
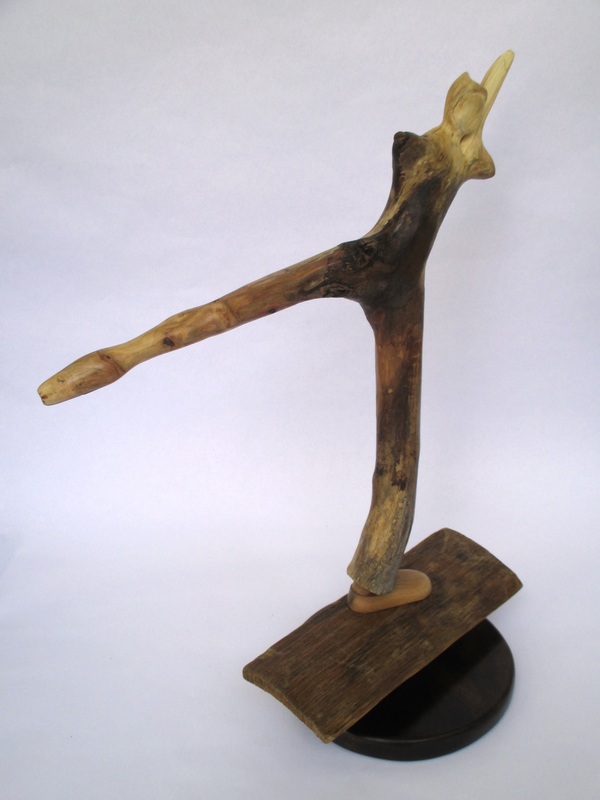
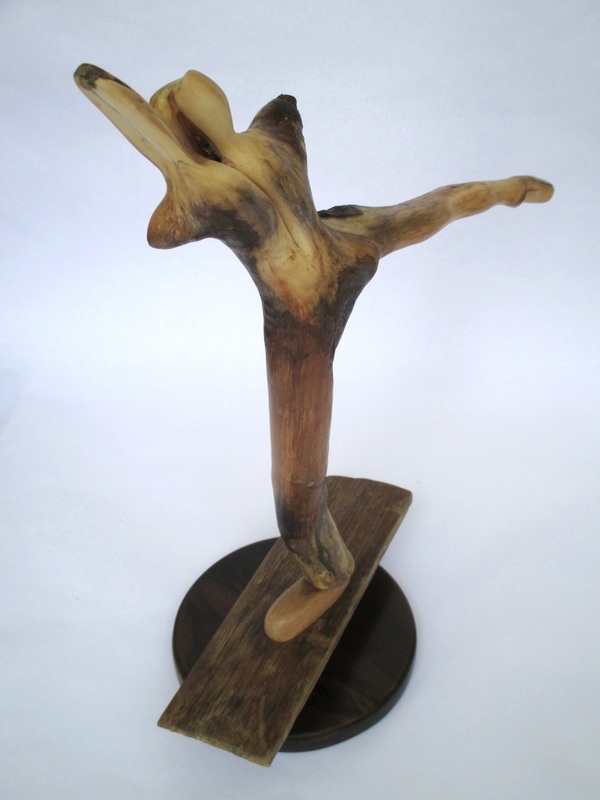
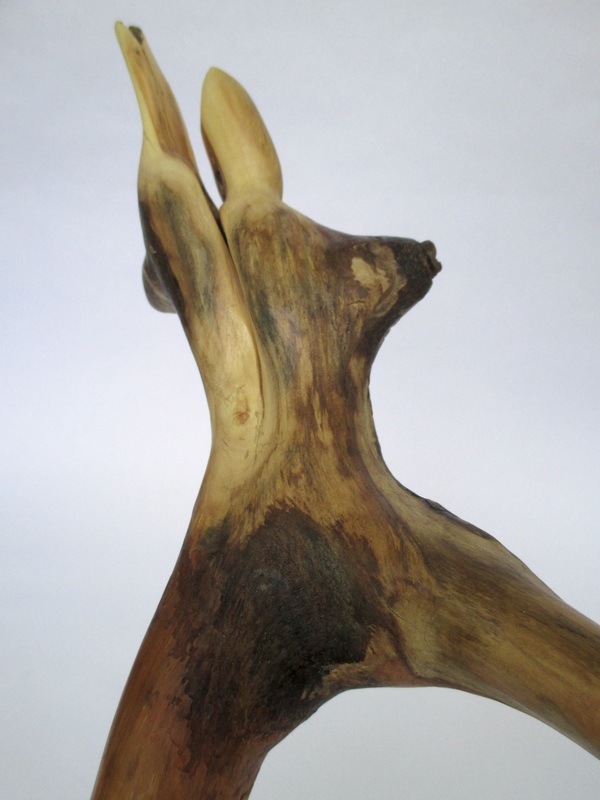
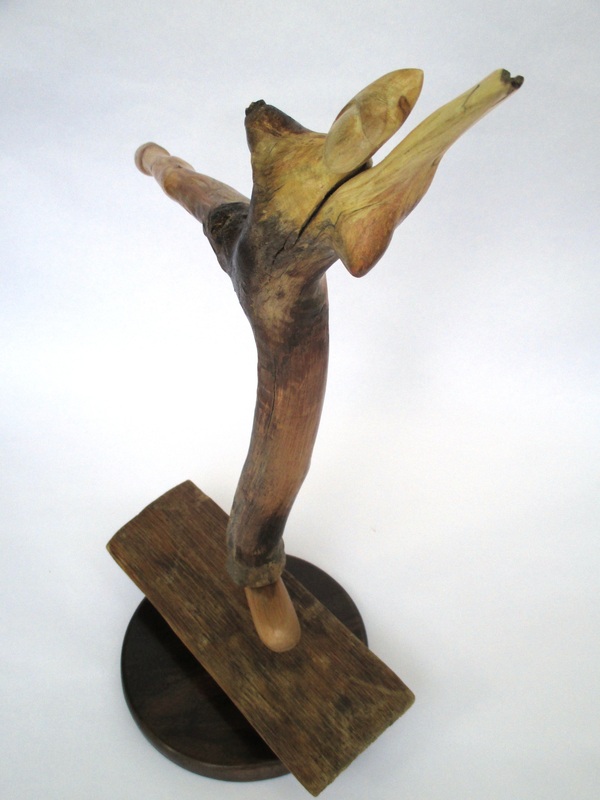
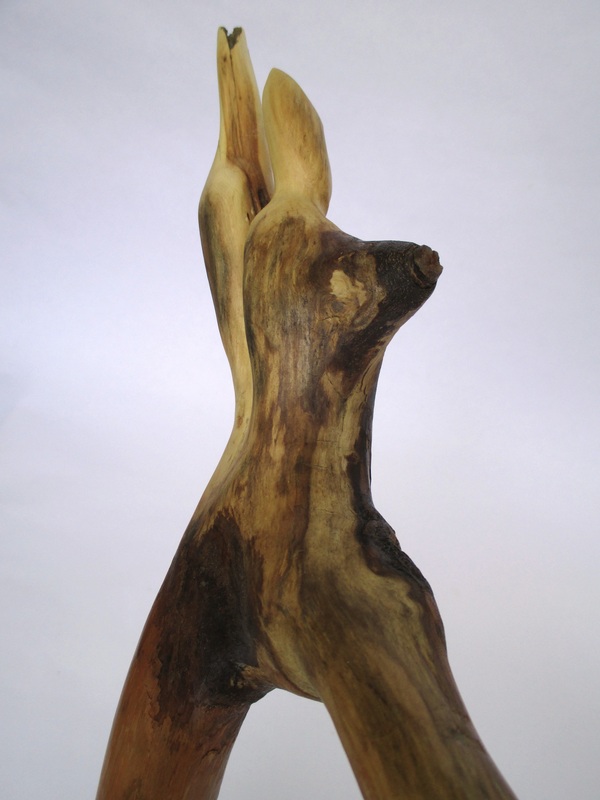
* Note : more information about the relief casting process can be found in my Blog entry for 5/29/13. 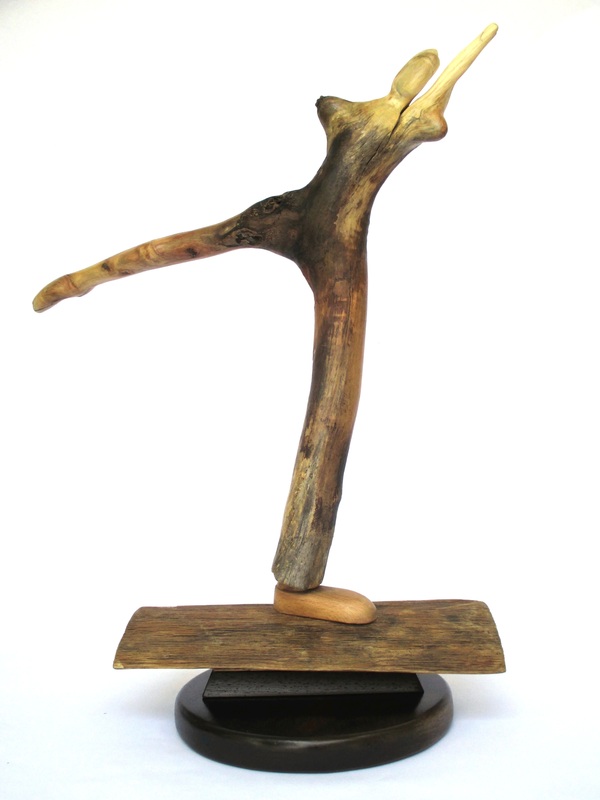 Driftwood Dancer ... 17" h Driftwood Dancer ... 17" h The Driftwood Dancer sculpture that I wrote about in my previous blog entry (7/19/14) has been completed. Prior to doing the surface finish work I increased the depth of the undercuts that I had made beneath the curved top of the board that the figure was to be mounted on. I did this in order to enhance the feeling of elevation and lightness in the piece. After lightly staining the underside of the board with Minwax Provincial wood stain to match it with the top surface, I sealed the board with a light coat of satin polyurethane. I also coated the trapezium shaped piece of wenge and the round disk of walnut with satin poly. I then used wood glue and screws to attach the curved baseboard to the pieces of wenge and the walnut disk.
|
AuthorCynthia Smith, Maine artist, originally from Connecticut. Taught art at secondary level for 35 years, retired in 2004. Sculpts in bronze, wood, stone, clay & plaster. Her work can be seen at several mid-coast Maine galleries and shows. 
Archives
June 2023
|
 RSS Feed