C.V.SmithARTWORKS
  • Home
  • Blog
  • Sculptures
    • Bronze
    • Clay / Apoxie Clay
    • Plaster
    • Wood
    • Stone
    • SLIDESHOW
  • Galleries
  • Contact
  • Book
  • River Arts
  • BRAF
  • Saltwater Artists
  • CMCA
  • Yarmouth Art Festival

Knock Knock .... Who's There? ... Bronze Man !

5/30/2014

0 Comments

 
Picture
Picture
Picture
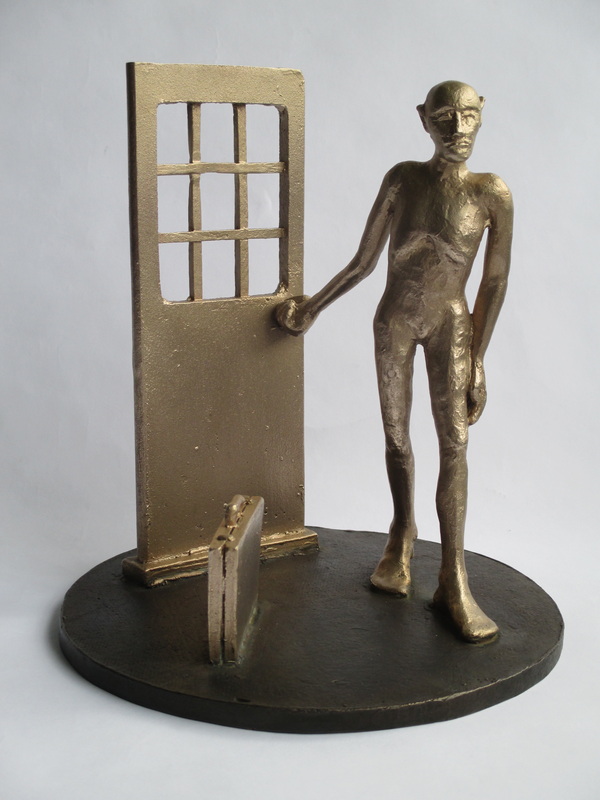
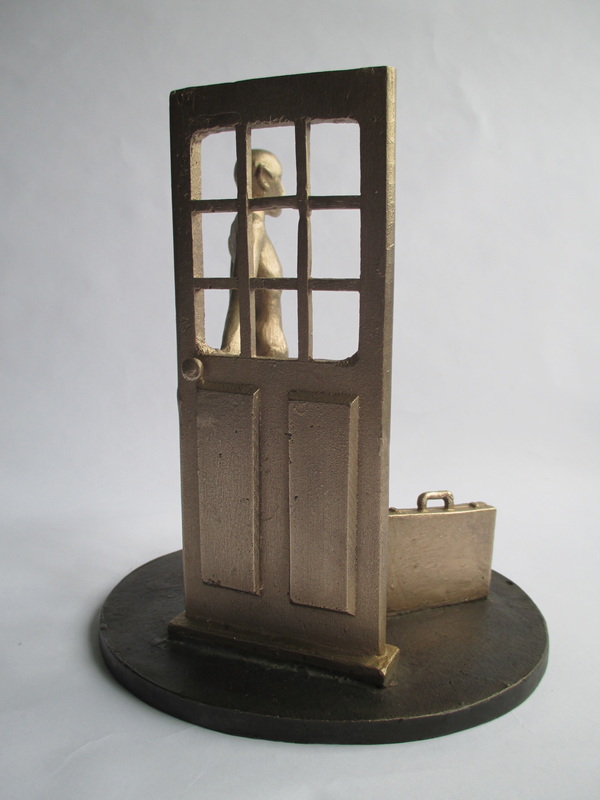
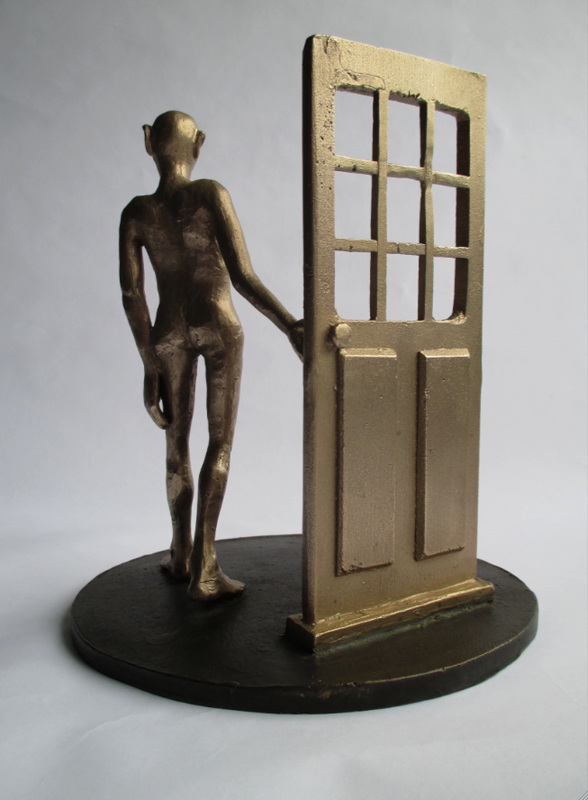
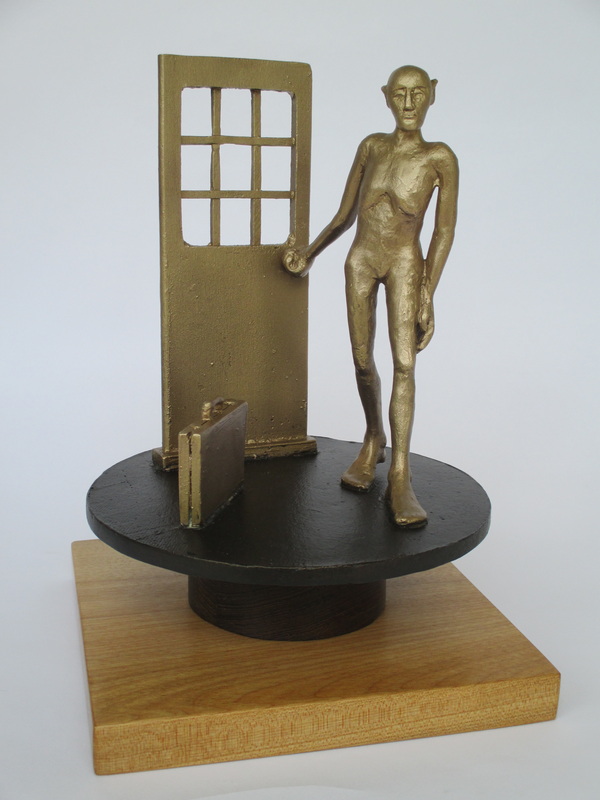
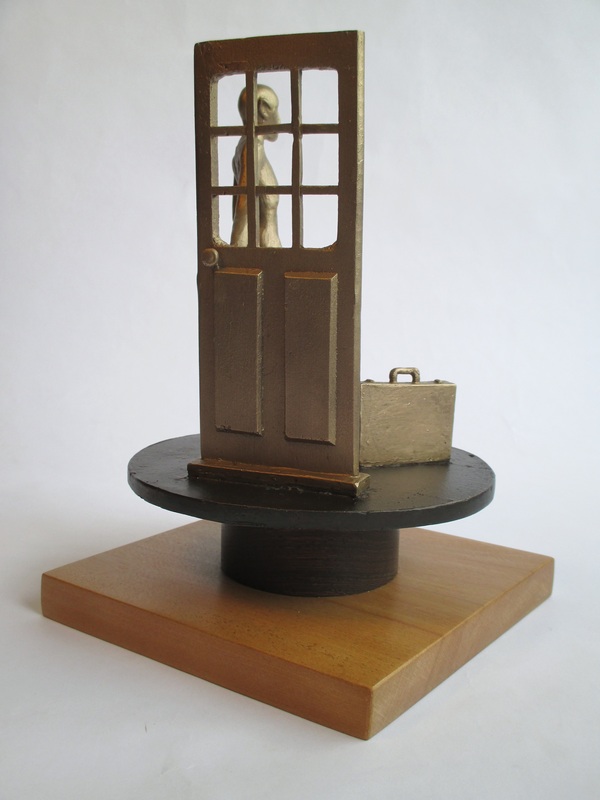
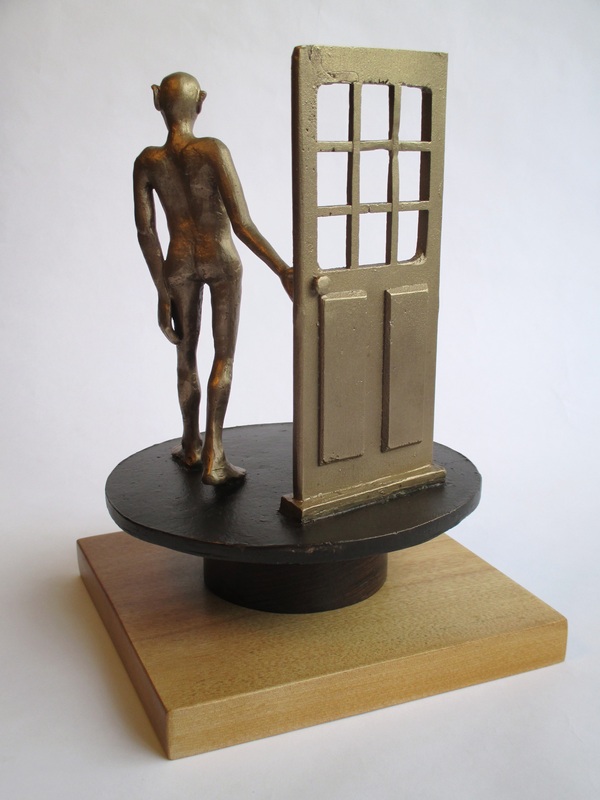
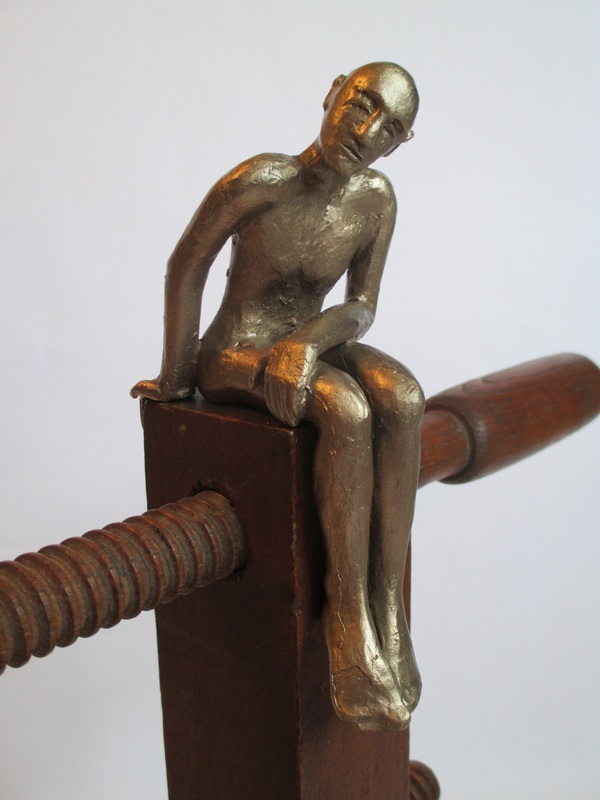
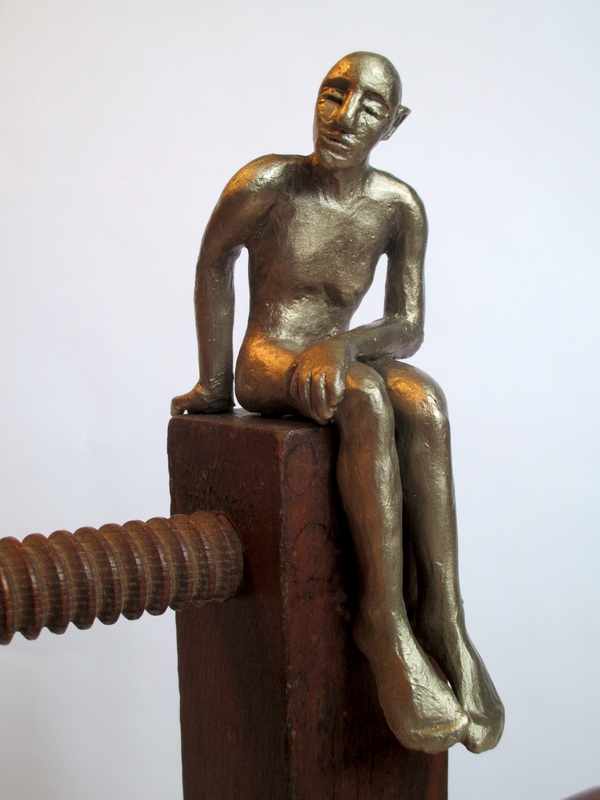
     After a session with the bead blaster the bronze man with door and case were ready for the application of their patinas (see blog entry for 4/23/14). I decided that this piece would be most visually effective if I made the round base dark and kept the figure, door and case a natural bright bronze color. I brushed alternating layers of brown and black Birchwood Casey bronze patina on the base until I got the level of darkness that I wanted for the piece. (A variety of BC patinas are available online through Sculpt Nouveau.) After rinsing the circular base with water to stop the darkening of the patina, I coated the entire sculpture with clear satin spray lacquer. 
Picture
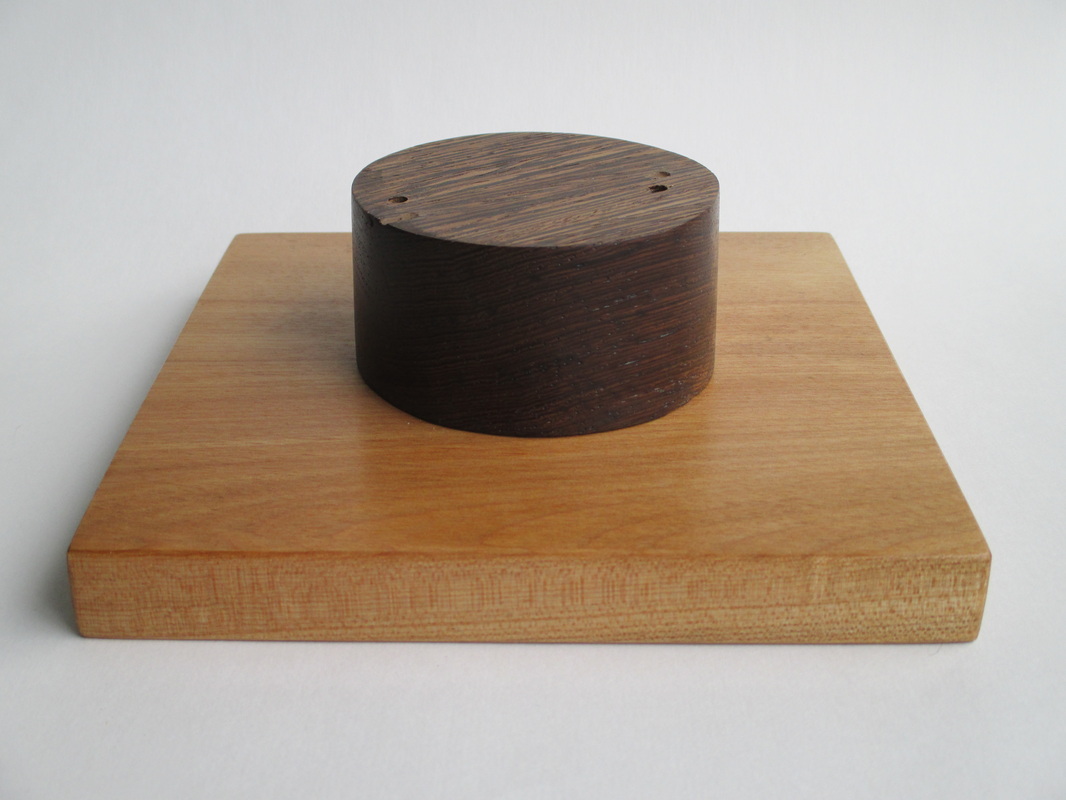
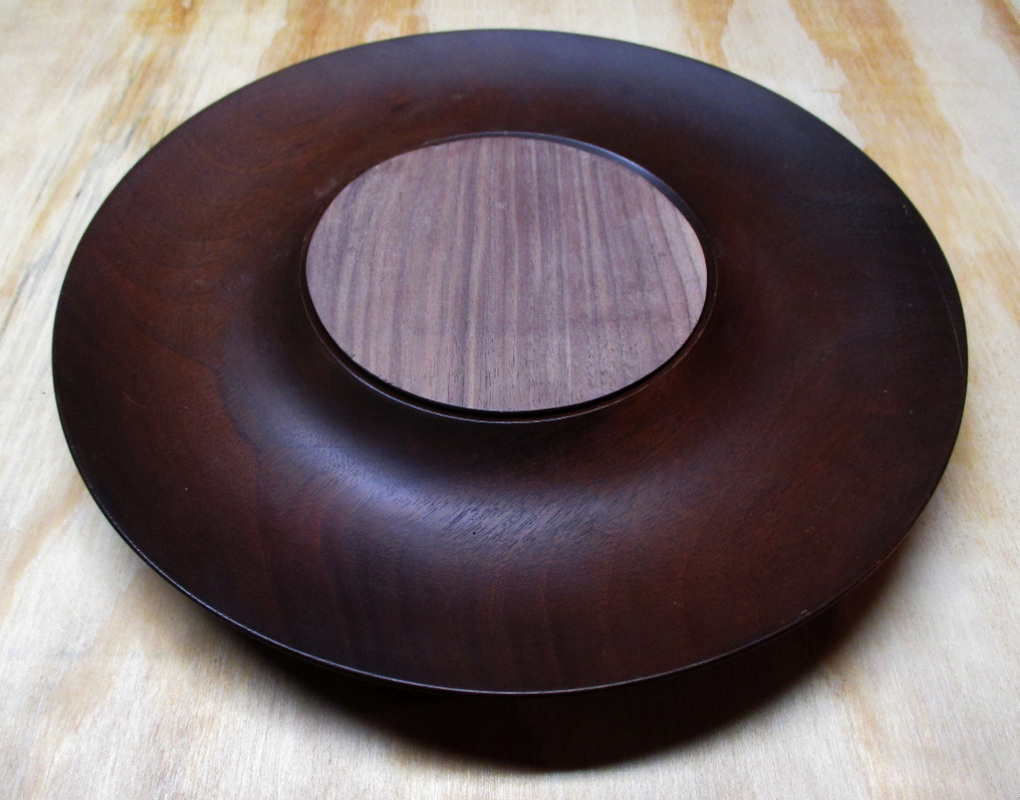
     The next step was to make the wooden base for the piece. I happened to have a small piece of wenge that was 1 1/2" thick and I thought the dark color of the wood would be a great match for the color on the bronze base. I cut it into a circular form that was 3 inches in diameter and sanded it smooth. Then I cut and finished a 6 1/2 " x 6 1/2" square of maple to put under the wenge cylinder.
    After coating both pieces of wood with satin finish polyurethane I was ready to assemble all of the pieces. The trickiest part of this process was using  a tap & die to create 2 threaded holes in the circular bronze base so that I could use threaded rods to attach the bronze to the wooden base. The bronze base is only 1/4" thick and I wanted avoid breaking through the top surface, so I positioned one hole under the back foot of the figure and another under the case to take advantage of the additional depth of bronze. Next I had to drill holes through the wood that exactly matched the positioning of the holes in the bronze. After epoxying one end of each rod in each hole in the bronze base, I threaded the rods through the corresponding holes in the wooden base. Finally I put the washers and nuts on the ends of the rods and tightened them to secure the pieces together. Another piece completed! And so - on to the next....
Picture
Picture
9" tall
Picture
 * For additional information on the creation of this piece see my blog entries for - 3/3/14, 3/15/14, & 4/10/14.
                                                        
0 Comments

Holy Cow! ... A Lunar Eclipse in Bronze !

5/17/2014

0 Comments

 
Picture
Picture
Picture
Picture
12 3/4" diameter
    After finishing the wooden clamp & figures project (see my blog entry for 5/4/14), I began the process of readying the elements I would need to complete the "cow jumping over the moon" piece. The first thing that I did was use a tap & die to drill 2 threaded holes in the back side of the bronze moon and 1 in the peg on the back of the cow. These would enable me to bolt the pieces to the base. Next I made a walnut piece to fit into the central depression of the walnut tray that I was using for the sculpture's base. This would give me a secure depth of wood to which I could fasten the moon. I drilled 2 holes through both the walnut insert and the tray that matched the positioning of the holes in the back of the bronze moon. I also drilled a hole in the tray for the cow's attachment peg. I slightly widened the holes on the back side of the tray to accommodate the addition of washers and nuts.
     Once I sprayed both the cow and the moon with clear satin lacquer in order to retain their bronze color, I proceeded to mount each piece to the base using short lengths of threaded rod - the moon first and then the cow. (I put a small amount of epoxy in each hole in the bronze so that the rods would not unscrew when I tightened the nuts at the back of the base.) Next I tackled the small wooden knob top that needed to be colored to represent the earth. First I coated the knob with a white primer and then I used water color pencils to create the illusion of the North and South American continents and surrounding oceans. I sealed it with clear satin lacquer. After it dried, I drilled a hole in the back of the knob and glued in a short wooden peg. I put wood glue on the peg and inserted it into a hole I had drilled in the base just below and to the right of the moon. The final step was put screw eyes and a hanging wire on the back of the piece. Because of the weight of the bronze, I also added a small piece of wood at the bottom of the base that would allow the piece to hang at an appropriate angle to the wall. 
    Another piece completed - and on to the next! I think I hear someone at the "door" ... stay tuned!

*For more information and background on this piece see my blog entries for - 3/3/14, 3/15/14, 4/10/14, & 4/23/14.
0 Comments

Mount Up! ... Two Bronze Men & A Wooden Clamp

5/4/2014

0 Comments

 
Picture
Picture
Picture
Picture
17 1/2" x 6" x 14"
      I  finally reached the finishing stage of my most recent bronze casting projects. The bronze pieces were chased and bead blasted, and were ready for patina application and attachment to their respective bases. The first project that I tackled was the one that involved the two small figures and the wooden screw clamp. I chose to spray the figures with a clear statin finish lacquer in oder to retain a natural bright bronze patina color that would contrast with the darker color of the wooden screw clamp. Before mounting the figures on the tops of the clamp, I had to attach the wooden clamp to the base board. I drilled 2 holes in the small ends of each of the wooden jaws of the clamp. After cutting four 3" lengths of threaded rod, I inserted each into a hole with a small amount of epoxy to hold the rod in place (leaving just over 1/2 inch of rod protruding). I had previously sanded the yellowheart wood base board and coated it with satin polyurethane, so the next step was to drill 4 holes that corresponded to the placement of the threaded rods in the ends of the clamp. On the underside of the yellowheart board I used a larger drill bit to widen the holes enough to accommodate the nuts and washers that would hold the clamp in place. Now I was ready to put the piece together.
     I positioned the clamp over the holes in the base board and inserted the protruding threaded rod ends into the holes. I then threaded the washers and nuts onto the rod ends and tightened them. The next step was to fasten the figures to the tops of the clamp jaws. I did this by inserting the pegs attached to their undersides into the epoxy that I had put into the holes in the top of the clamps. This would not only serve to hold the figures in place, but it will also keep the top wooden screw in place. The final step was to put a small amount of wood glue on a few threads of the lower wooden screw and then turning that into its final secured position. Oila! Finito! And on to the next piece.....
     
*For more information on the background and creation of this piece see my blog entries for -  3/3/14, 3/15/14, 4/10/14 & 4/23/14.
0 Comments

    Author

    Cynthia Smith, Maine artist, originally from Connecticut. Taught art at secondary level for 35 years, retired in 2004. Sculpts in bronze, wood, stone, clay & plaster. Her work can be seen at several mid-coast Maine galleries and shows.

    Picture

    RSS Feed

    Archives

    October 2022
    May 2022
    December 2021
    October 2021
    June 2021
    May 2021
    April 2021
    March 2021
    October 2020
    August 2020
    July 2020
    June 2020
    January 2020
    October 2019
    September 2019
    August 2019
    July 2019
    June 2019
    May 2019
    April 2019
    February 2019
    January 2019
    November 2018
    October 2018
    September 2018
    August 2018
    July 2018
    June 2018
    May 2018
    April 2018
    March 2018
    February 2018
    January 2018
    November 2017
    September 2017
    August 2017
    July 2017
    June 2017
    May 2017
    March 2017
    January 2017
    September 2016
    August 2016
    July 2016
    June 2016
    May 2016
    April 2016
    March 2016
    February 2016
    January 2016
    December 2015
    November 2015
    October 2015
    September 2015
    August 2015
    June 2015
    April 2015
    March 2015
    February 2015
    January 2015
    December 2014
    November 2014
    October 2014
    September 2014
    August 2014
    July 2014
    June 2014
    May 2014
    April 2014
    March 2014
    February 2014
    January 2014
    December 2013
    November 2013
    October 2013
    September 2013
    August 2013
    July 2013
    June 2013
    May 2013
    April 2013
    March 2013
    February 2013
    January 2013
    December 2012
    November 2012
    October 2012
    September 2012
    August 2012

Powered by Create your own unique website with customizable templates.